DIY Spring Table Centerpieces: 5 Stunning Ideas for 2026
Why DIY Spring Table Centerpieces Are Every Busy Mom’s Secret Weapon
DIY spring table centerpieces are the perfect way to bring fresh seasonal joy to your home without breaking the budget or your busy schedule. According to Pinterest, searches for spring table decor spike by over 200% each March and April, proving that families everywhere crave that burst of seasonal creativity.
Quick DIY Spring Centerpiece Ideas:
• Tray displays – Stack books under potted flowers on a wooden tray
• Mason jar arrangements – Fill with fresh tulips or daffodils
• Faux flower nests – Use grapevine and silk blooms for all-season beauty
• Edible centerpieces – Combine fresh fruit with spring flowers
• Paper craft options – Perfect for kids to help create
The best part? Most spring centerpieces can be assembled in 20 minutes or less using items you already have at home. From repurposed mason jars to stacked books for height, these DIY projects prove that stunning seasonal decor doesn’t require a design degree or expensive supplies.
Whether you’re hosting Easter brunch, celebrating a spring birthday, or simply want to brighten your everyday dinner table, these centerpiece ideas will help you create memorable moments for your family.
I’m Amanda Schmitt, and as a former occupational therapist turned full-time mom of two, I’ve learned that the most beautiful DIY spring table centerpieces come from combining creativity with practicality. My goal is to help busy families like yours create stunning seasonal decor that actually works with real life – kids, spills, and all.
Key DIY spring table centerpieces vocabulary:
– Easy Easter craft projects
– vernal equinox
– Easter Sunday brunch menu
Gathering Supplies: The Spring Centerpiece Toolkit
There’s something magical about changing everyday household items into stunning DIY spring table centerpieces. The best part? You probably already have most of what you need tucked away in cabinets and closets around your home.
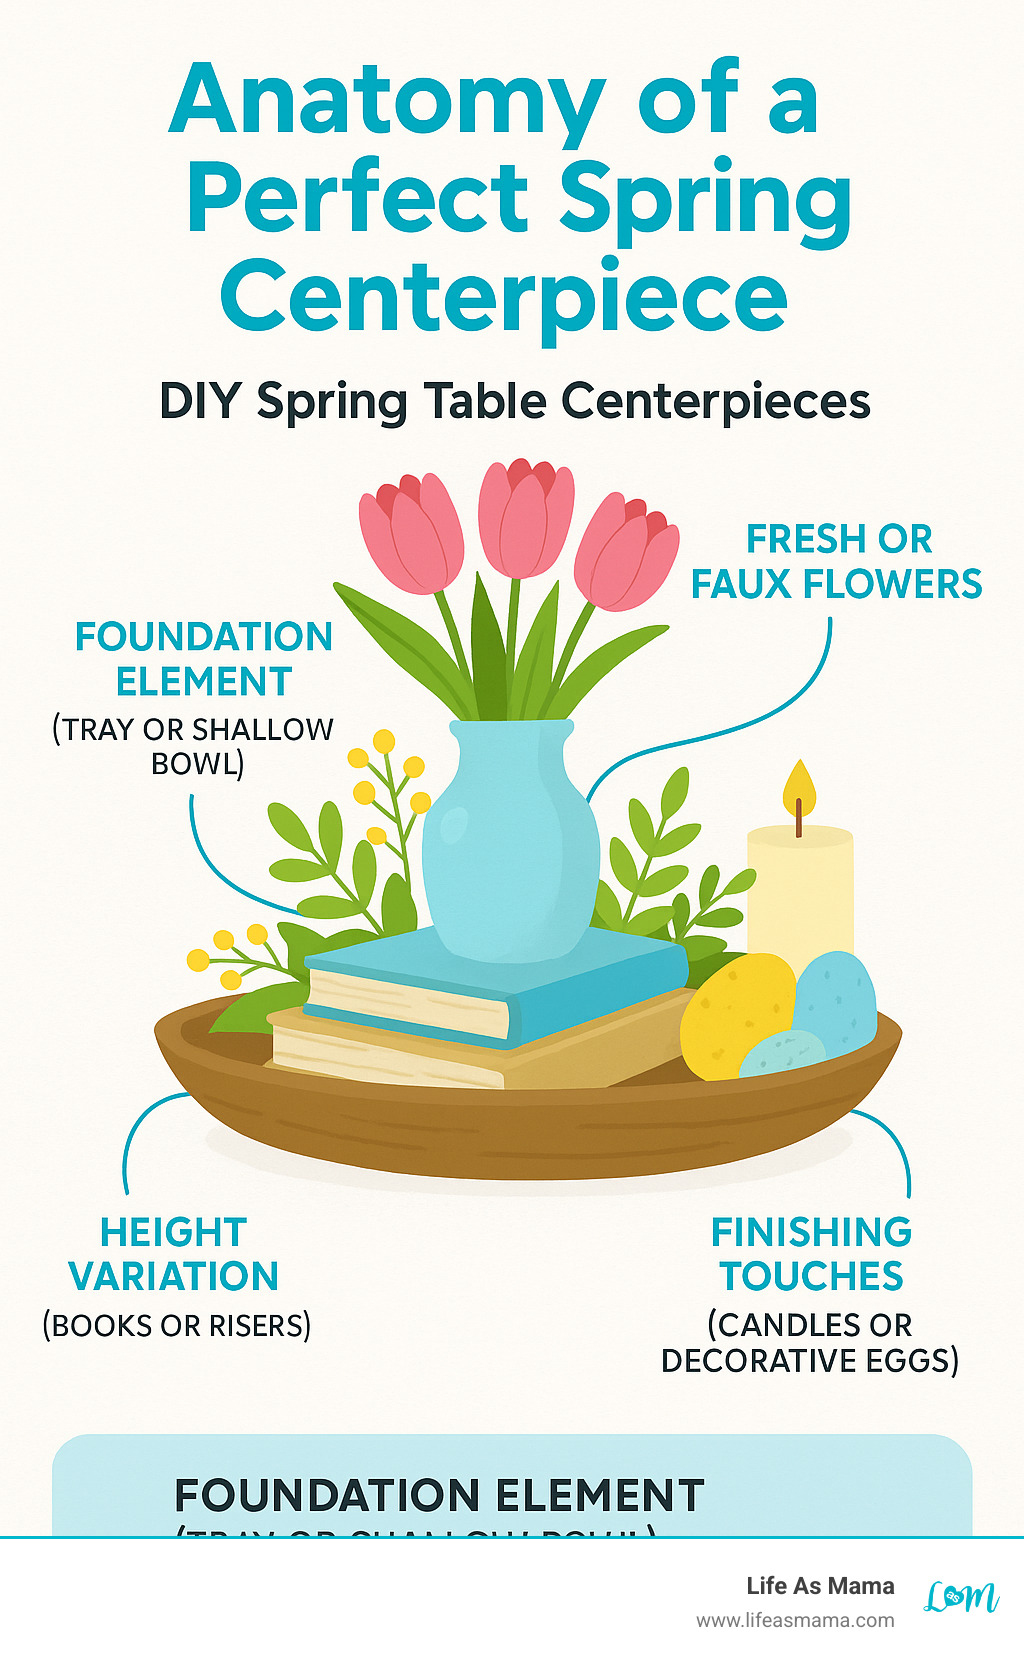
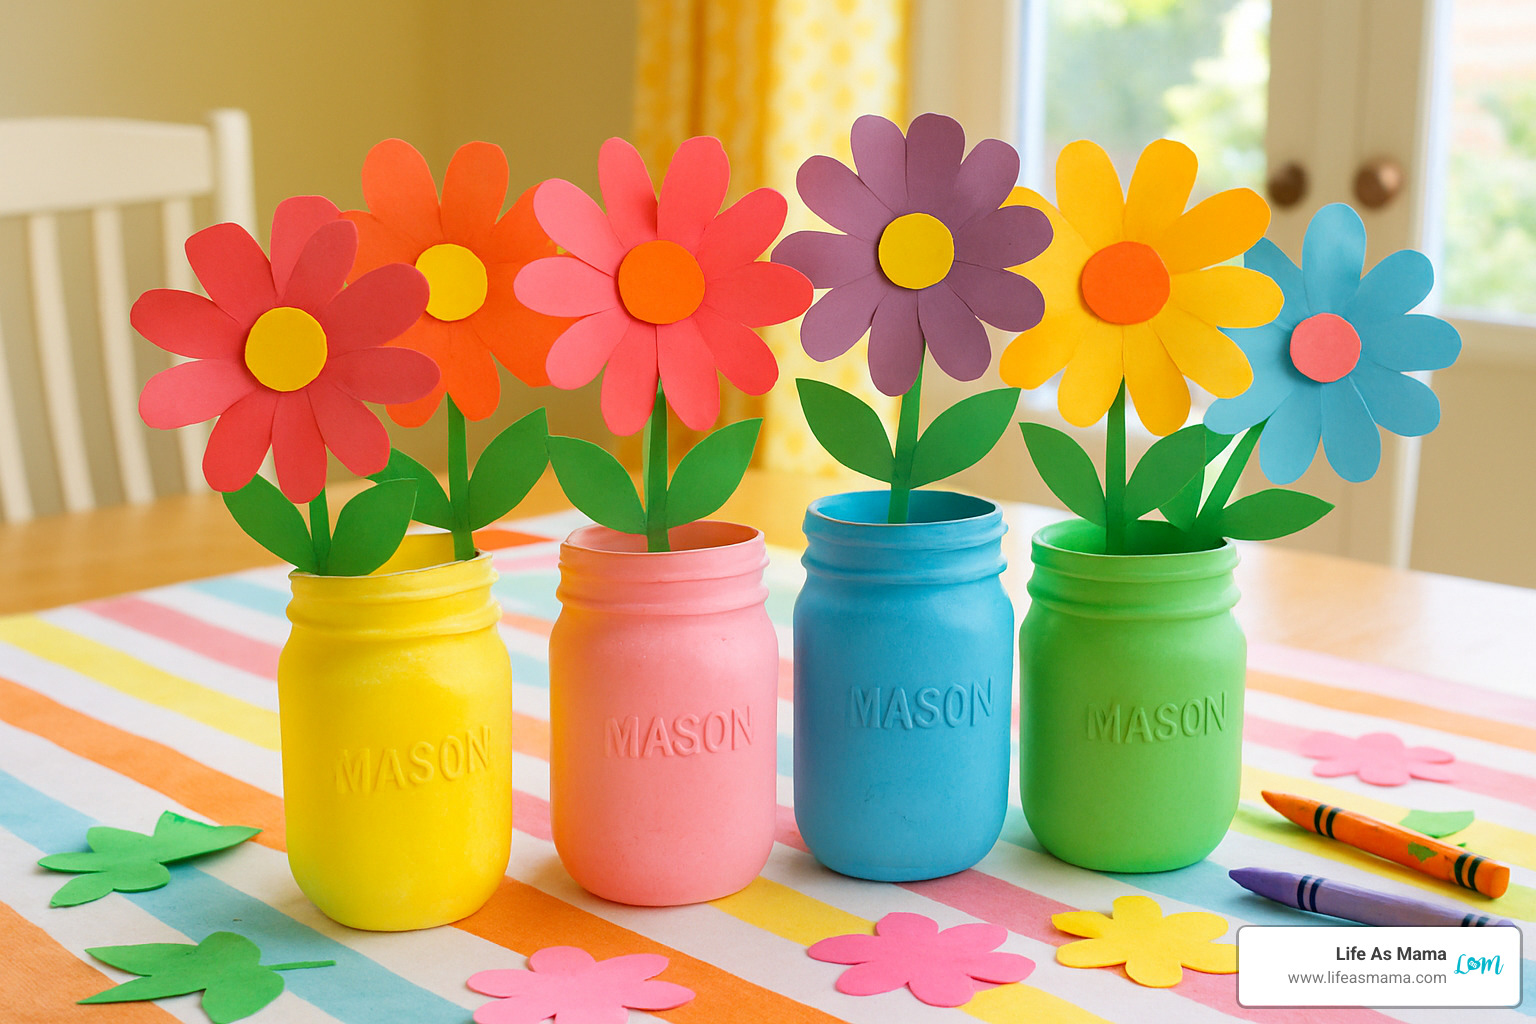
Let’s start with your foundation pieces – these are the workhorses that make everything else shine. A wooden tray is absolutely essential because it pulls your entire arrangement together and makes moving your centerpiece a breeze when dinner’s ready. I love using a circular wood tray because the round shape feels so organic and welcoming. Mason jars are another must-have – they’re practically free if you save them from pasta sauce and pickles, and they look charming filled with fresh spring blooms.
Don’t overlook shallow bowls or baskets either. These create wonderful nest-like displays that feel perfectly seasonal. And here’s my favorite secret weapon: books! Stack a few under your containers to add instant height and visual interest.
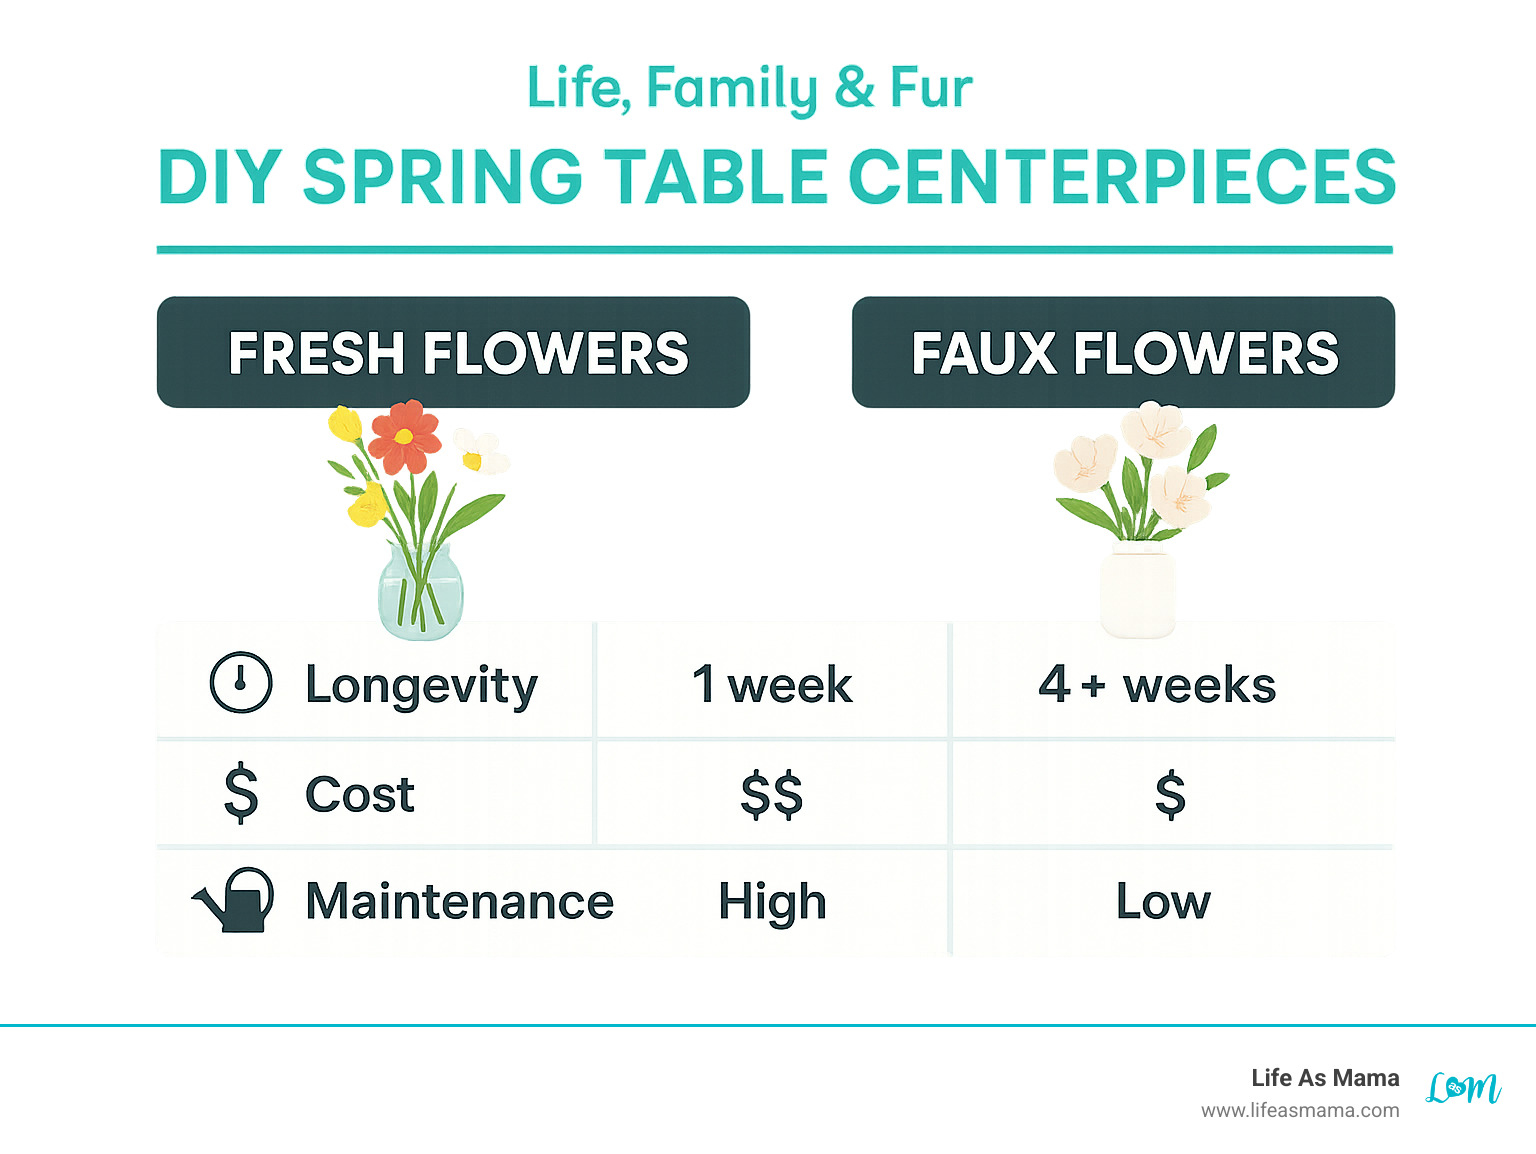
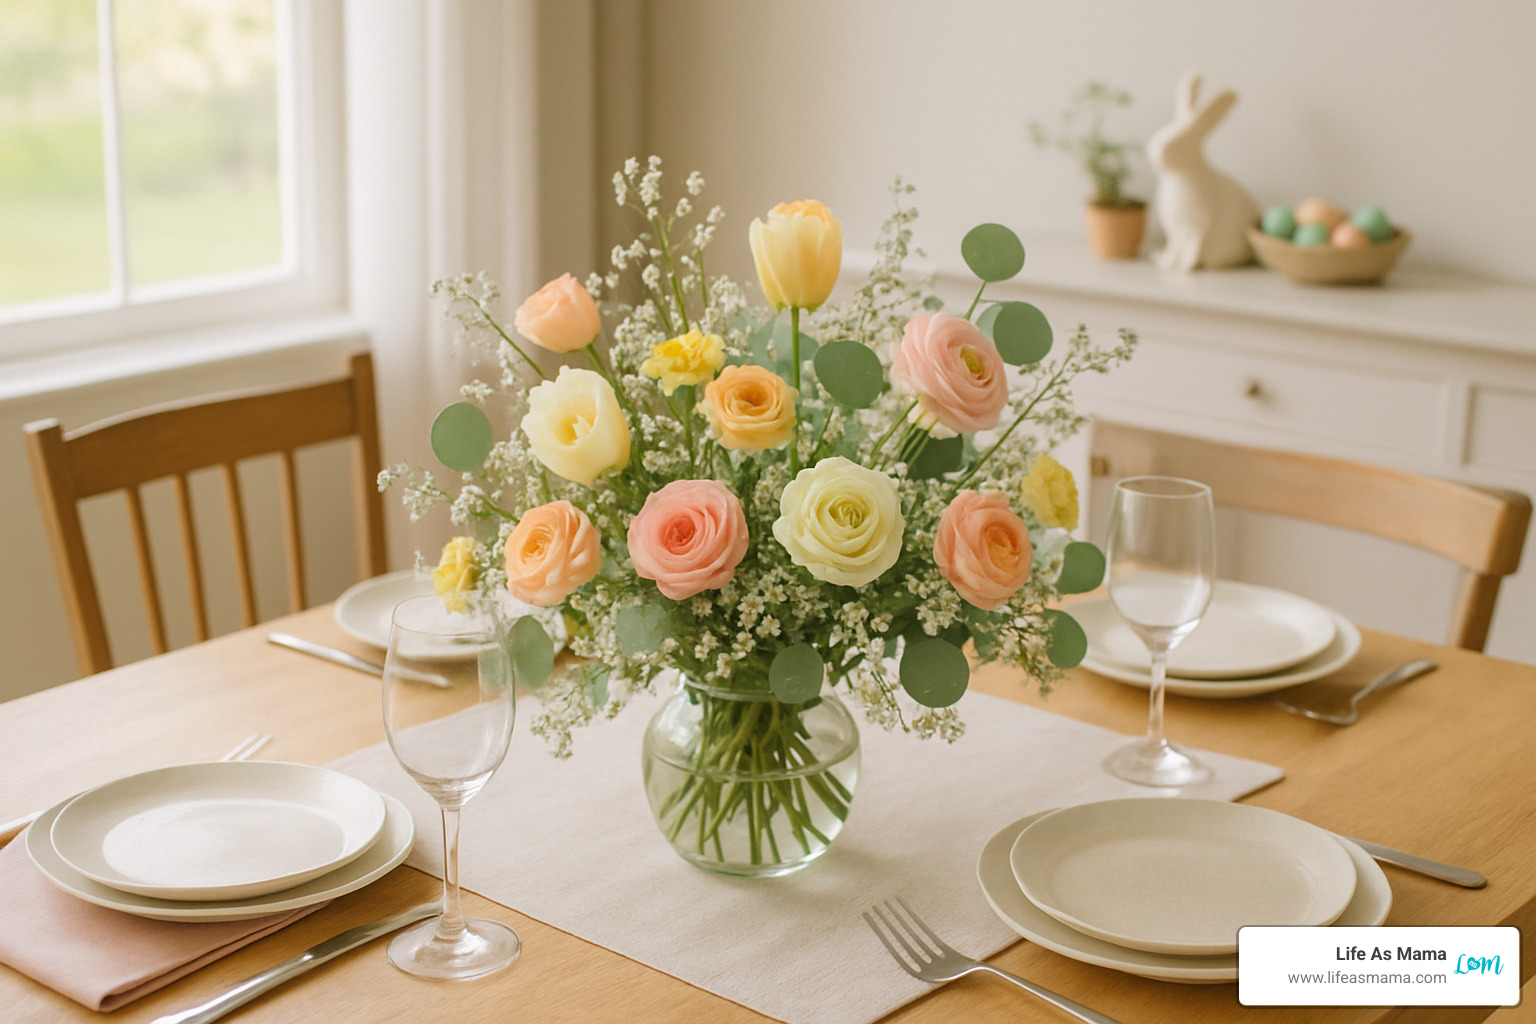
Now, let’s talk flowers. The fresh versus faux debate doesn’t have to stress you out. Fresh flowers like tulips, daffodils, and hyacinths bring that authentic spring fragrance and typically last about a week with proper care – perfect for special occasions or when you want that extra touch of luxury.
Faux flowers are a busy mom’s best friend, though. Modern silk flowers look incredibly realistic, and as one clever crafter put it, “Because it’s faux, this is a centerpiece that can last all Spring, no water needed.” No wilted petals on your dining table, no forgotten water changes – just beautiful blooms that stay put.
Here’s where the real fun begins: upcycled vessels. Start looking at everyday items with fresh eyes. Those vintage perfume bottles collecting dust? Perfect bud vases. Tea tins make charming planters, while painted mason jars add a pop of color. I’ve even seen creative moms use mini rain boots and galvanized buckets for rustic charm.
My best advice? Start a “centerpiece stash” in a clear storage box. Collect interesting containers throughout the year so you’re always ready to create something beautiful without a shopping trip. This approach keeps your budget happy while giving you endless creative possibilities.
For even more seasonal inspiration that pairs beautifully with your table displays, don’t miss our 7 Stunning Spring Wreath Ideas – they’re perfect for creating a cohesive spring look throughout your home.
5 Showstopping DIY Spring Table Centerpieces
Here’s where the magic happens! These five DIY spring table centerpieces are designed with busy families in mind – each one takes less than an hour to create, and I’ve included options for both fresh and faux materials so you can choose what fits your lifestyle best.
Tray Chic Tulip Display
This farmhouse-inspired beauty is my go-to when I need something gorgeous in just five minutes. The secret? Using stacked books to create instant height variation – it’s a trick I learned from watching too many home design shows!
You’ll need a circular wood tray about 20 inches wide, 2-3 books of different sizes, and 3-4 potted spring flowers like tulips or daffodils. Add a decorative nest with eggs and maybe some small bunny figurines if you’re feeling festive.
Start by placing your wooden tray in the center of your table. Stack the books at varying heights around the tray – don’t worry if the book covers aren’t pretty, just wrap them in kraft paper or fabric. Set your potted flowers on these book pedestals, adjusting heights until it looks balanced. Fill any awkward empty spaces with your nest or spring figurines.
The genius of this design is that books are the perfect thing to use when you need height, and the wooden tray keeps everything contained for easy moving when dinner’s ready. You’re basically creating that triangular composition that professional florists charge big money for!
Farmers-Market Fruit & Floral Runner
This edible centerpiece brings together spring flowers and colorful citrus for a display that’s both stunning and practical. I love when my centerpiece can actually contribute to the meal! The detailed steps are available in this helpful Pizzazzerie fruit & floral tutorial.
Gather 5-7 mason jars in different heights, fresh eucalyptus branches, seasonal flowers from the grocery store, and an assortment of citrus fruits – lemons, limes, and oranges work beautifully. You’ll also want a long wooden board or tray to hold everything.
Line up your mason jars along the wooden board, making sure to vary the heights for visual interest. Fill each jar with water and start with eucalyptus branches as your green foundation. Add your fresh flowers next, cutting stems to fit each jar perfectly. Then scatter the citrus fruits between the jars – slice a few pieces to show off those gorgeous colorful interiors.
The best part? Your guests can actually grab citrus slices for their water or tea throughout the meal. It’s functional and beautiful!
Evergreen Faux Nest DIY Spring Table Centerpiece
For those weeks when life gets crazy and you need something beautiful that requires zero maintenance, this faux flower arrangement is your new best friend. One crafter told me, “Because it’s faux, this is a centerpiece that can last all Spring, no water needed” – and honestly, that sold me immediately.
You’ll need a shallow basket, some grapevine twig garland, a brick of floral foam, about 30-45 faux tulips and daffodils, and Spanish moss to cover everything up nicely.
Unwrap the grapevine garland and loosely wrap it around your basket to create that cozy nest effect. Cut your floral foam to fit the basket (keep the plastic wrap on to avoid mess), give it a quick soak, and nestle it inside. Trim the plastic from your faux flower stems but leave those wire stems intact – you’ll need them for stability. Insert flowers into the foam, varying the stem lengths to look natural. Cover any visible foam with Spanish moss for that finished, professional look.
This centerpiece is perfect for families who travel frequently or just want to set it and forget it for the entire season.
Kid-Crafted Paper Bloom DIY Spring Table Centerpiece
Nothing beats getting the kids involved in creating family memories, and this colorful paper flower project is completely safe for little hands while still looking absolutely charming on your table.
Round up some coffee filters or tissue paper, food coloring or watercolor paints, mason jars, green pipe cleaners, and acrylic paint for decorating the jars. The hot glue gun stays in adult hands only!
Let your kids go wild painting mason jars in spring pastels – this is where the magic happens and their personalities really shine through. Help them dye coffee filters by dipping in colored water or painting with watercolors. Once everything’s dry, layer 3-4 filters together and pinch them in the center. Twist a pipe cleaner around that pinched area to create a stem, then fluff those filter petals until you have full, gorgeous blooms.
This project transforms rainy spring afternoons into memory-making time, and your kids will beam with pride every time they see their artwork displayed on the family table.
Candlelit Branch & Egg Easter Adaptation
This versatile centerpiece works beautifully for everyday spring decorating and transforms seamlessly into special Easter celebrations with just a few tweaks.
Gather some blooming branches – forsythia and cherry work wonderfully, or you can buy flowering branches from the grocery store. Add battery-operated candles for safety, some dyed Easter eggs, a shallow tray or wooden board, and small glass containers for your branches.
Start by arranging the battery candles on your tray base, then place small glass containers between them. Insert your blooming branches in the containers with water, and scatter those beautiful dyed eggs around the base. When Easter arrives, simply add seasonal touches like small nests or bunny figurines.
The key here is using battery-operated candles instead of real flames – this keeps everything safe around children and natural materials while still giving you that warm, glowing ambiance.
For even more Easter inspiration to complement your table, check out our 6 Colorful DIY Easter Decorations.
Styling Like a Pro: Size, Balance & Personality
The difference between a “nice” centerpiece and one that makes your guests say “Wow!” isn’t about spending more money – it’s about understanding a few simple design tricks that professional florists use every day.
Let me share the secrets that will transform your DIY spring table centerpieces from good to absolutely gorgeous.
Master the Odd-Number Magic
Here’s something I learned from a florist friend that changed everything: our eyes naturally find odd numbers more pleasing than even ones. Instead of placing two matching candles on your table, try three. Rather than using four small vases, go with three or five. This simple switch instantly makes any arrangement look more intentional and professionally styled.
The Foolproof Height Test
Nothing ruins a beautiful dinner like having to peek around a towering centerpiece to talk to your family! Here’s my favorite trick: sit at your table and place your elbow down, then make a fist. Your centerpiece should never be taller than the top of your fist – usually around 12 inches max.
For taper candles, keep the flames below eye level when everyone’s seated. This ensures your gorgeous arrangement improves conversation rather than blocking it.
Spring Color Combinations That Never Fail
Some color combinations just work beautifully together, and spring gives us so many gorgeous options. Soft pastels like blush pink, pale yellow, and sage green create that dreamy cottage feel. If you prefer more energy, try fresh brights – coral, sunny yellow, and crisp white practically shout “spring is here!” For something timeless, you can’t go wrong with classic spring colors: lavender, butter yellow, and fresh green.
The key is picking one palette and sticking with it throughout your arrangement.
The Secret of “Fluff” Stems
Professional florists have this wonderful term called “fluff” – those delicate, wispy stems they add at the very end of an arrangement. As one designer told me, “Fluff is what you add at the end… it takes it from nice to OH, THAT’S SO PRETTY!”
Queen Anne’s lace, baby’s breath, pussy willow branches, and eucalyptus sprigs all make perfect fluff. These soft textures fill in gaps and give your centerpiece that finished, professional look.
Adding Personality Beyond Flowers
The most memorable centerpieces tell your family’s story. Textural elements like moss, interesting twigs, or smooth stones add visual interest. Seasonal touches such as Easter eggs, small bird nests, or delicate butterfly picks celebrate the moment.
Don’t forget about functional additions – small potted herbs that guests can pinch for their water glasses, or beautiful serving pieces that become part of the display. Personal items like a vintage photo in a small frame or your child’s latest artwork can make the arrangement uniquely yours.
Book lovers might tuck vintage gardening books under their flower arrangements. Craft enthusiasts could showcase handmade pottery as vases. The goal is creating something that feels authentically like your family.
Creating Visual Balance
Think of your centerpiece as having three levels: low, medium, and high elements. This creates depth and keeps the eye interested. A low bowl of moss, medium-height flowers, and tall branches work together beautifully. Even something as simple as varying the heights of candles can create this professional layered look.
For more styling inspiration that works throughout the year, check out our 7 Creative Thanksgiving Table Designs – many of these principles translate perfectly to spring decorating.
The most beautiful DIY spring table centerpieces aren’t perfect – they’re personal. Trust your instincts, have fun with the process, and don’t be afraid to move things around until they feel just right.
Common Mistakes & How to Avoid Them
Let’s be honest – we’ve all been there. You spend time creating what you think will be a gorgeous DIY spring table centerpiece, only to have it topple over during dinner or block everyone’s view of each other. After helping countless families create beautiful seasonal displays, I’ve seen the same mistakes pop up again and again.
The biggest culprit? Overcrowding your arrangement. I get it – when you’re excited about spring decorating, it’s tempting to add just one more flower, one more decorative egg, one more cute bunny figurine. But here’s the truth: less really is more with centerpieces. If your family can’t easily pass the mashed potatoes around your arrangement, it’s too large or too busy. Your centerpiece should improve your gathering, not become an obstacle course.
Unstable bases are another disaster waiting to happen, especially in homes with children. Before your guests arrive, give your centerpiece the “toddler test” – gently bump the table and see what happens. Use wide, heavy bases whenever possible, and if you’re working with lightweight elements, secure them with floral foam or add hidden weights to the bottom of containers.
The blocked sightlines problem is probably the most common complaint I hear from families. Nothing kills dinner conversation quite like having to play peek-a-boo around a massive floral arrangement. Remember our elbow-fist test from earlier, and when you’re unsure, always go lower rather than taller. Your kids should be able to see their grandparents across the table without craning their necks.
Fire safety often gets overlooked in the excitement of creating ambiance. Never leave real candles unattended, especially around children or pets. The good news? Battery-operated candles have improved dramatically and provide beautiful flickering light without any worry. Trust me, the peace of mind is worth it.
Here’s something that might surprise you: cost overruns happen more often than you’d think with centerpiece projects. It’s easy to get carried away at the craft store when you see all those pretty spring supplies. Set a realistic budget before you start shopping, and remember that some of the most stunning centerpieces use entirely free materials from your own backyard or items repurposed from around your house.
Always use a tray foundation for your centerpiece – this is non-negotiable in my book. Whether it’s a wooden tray, a shallow bowl, or even a pretty placemat, having a contained base makes your arrangement easy to move for meals and protects your table surface from water rings and spills.
Finally, if you’re using fresh flowers, don’t forget about water maintenance. Those beautiful tulips and daffodils are thirsty! Change the water every 2-3 days and trim stems at an angle underwater to help them drink better. If you know you’ll forget (and there’s no shame in that!), faux flowers might be your better bet for a stress-free spring display.
Frequently Asked Questions about DIY Spring Table Centerpieces
Let’s tackle the most common questions I hear from fellow moms about creating beautiful DIY spring table centerpieces that actually work in real family life.
What flowers and greenery last the longest?
When it comes to fresh spring blooms, tulips, daffodils, and hyacinths are absolute champions. These hardy spring favorites typically grace your table for 5-7 days with proper care, making them perfect for weekly refreshes or special occasions.
For greenery that goes the distance, eucalyptus is my go-to recommendation. This silvery-green beauty can last several weeks, and even when it dries out, it maintains its lovely appearance and subtle fragrance. Other preserved stems like pussy willow or flowering branches can also extend your centerpiece’s lifespan significantly.
If you’re looking for the ultimate longevity, high-quality faux alternatives have come incredibly far in recent years. Modern silk flowers can look stunning all season long without any maintenance – perfect for busy families who want beautiful tables without the daily upkeep.
Here’s a mom hack that really works: add just a drop of flower food to any grocery store bouquet to extend its freshness. Always cut stems at an angle under running water to help them drink better, and you’ll be amazed at how much longer they last.
How do I keep my centerpiece easy to move for meals?
This is probably the most practical question I get, and the answer is simpler than you might think. The secret weapon is tray foundations for absolutely everything. A circular wood tray transforms even the most elaborate floral display into something that moves as one neat unit.
Think about it – you can spend twenty minutes arranging the perfect spring scene, but if you have to dismantle it every time the family sits down to eat, you’ll stop making centerpieces altogether. With a sturdy tray, you simply lift the whole arrangement and set it on a nearby sideboard or console table.
Another family-friendly approach is creating grouped bud vases that can be quickly relocated individually. Choose lightweight containers like mason jars or small ceramic vessels that won’t strain your back when they’re filled with water and flowers.
My favorite strategy? Designate a “centerpiece parking spot” somewhere visible but out of the way – maybe on your kitchen island or a side table in the dining room. This way, your beautiful creation still decorates your home even when it’s not on the dinner table.
What height should my centerpiece be?
The elbow-fist method is foolproof and takes all the guesswork out of this decision. Simply place your elbow on the table with your fist raised – your centerpiece shouldn’t exceed this height. For most tables and chairs, this translates to staying under 12 inches tall.
This isn’t just about aesthetics – it’s about creating space for real conversation. Nothing kills family dinner chat faster than having to crane your neck around a towering arrangement to make eye contact with your kids or partner.
When using candles in your spring display, keep taper candles below eye level when everyone is seated. This creates beautiful ambient lighting without creating visual barriers.
There’s one exception to the height rule that actually works beautifully: very tall, narrow arrangements using single branches in slim vases. Think pussy willow branches or flowering cherry stems in tall, skinny containers. These work because they don’t obstruct views across the table – the visual “weight” stays at the top while leaving the conversation zone clear.
The key is testing your arrangement before guests arrive. Sit in different chairs around your table and make sure everyone can comfortably see and chat with each other. Your DIY spring table centerpieces should improve family connections, not hinder them.
Conclusion
There’s something magical about gathering your family around a table adorned with a beautiful DIY spring table centerpiece you created with your own hands. Whether it took you five minutes to arrange potted tulips on a wooden tray or an entire afternoon crafting paper flowers with the kids, these seasonal touches transform ordinary meals into special moments.
The beauty of spring centerpieces lies not in their perfection, but in the joy they bring to your everyday life. Your farmhouse-style tray display might have a few crooked tulips, or your kids’ paper flowers might be wonderfully lopsided – and that’s exactly what makes them perfect for your family.
At Life As Mama, we’ve learned that the most treasured family memories often unfold around the dinner table. A thoughtful centerpiece becomes the backdrop for homework help, birthday celebrations, and those precious conversations that happen when everyone slows down together. Even a simple mason jar filled with daffodils can make Tuesday night’s spaghetti dinner feel like a celebration.
The key is choosing centerpiece ideas that fit your real life. If you’re constantly busy, accept the beauty of faux arrangements that last all season. If you love fresh flowers but forget to water them, stick with hearty options like eucalyptus that forgive a little neglect. And if you have little helpers who want to contribute, let them – some of the most beautiful arrangements come from tiny hands and big imaginations.
There’s no wrong way to create a spring centerpiece. The best one is simply the one that makes you smile every time you walk past your dining table.
Ready to bring even more spring celebration to your table? Celebrate spring with fresh salad recipes that pair perfectly with your beautiful new centerpieces and continue the season of fresh, family-friendly joy!
Related Images:
Amanda Schmitt
Latest posts by Amanda Schmitt (see all)
- Fruit Infused Waters That Make Summer Hydration Fun - July 1, 2025
- Light Up Your Life: Home Lighting Decoration Ideas - June 30, 2025
- Let’s Taco Party! Easy Steps for a Perfect Taco Bar Setup - June 27, 2025