If you’re on the hunt for a foaming oil cleanser recipe that’s both hydrating and easy to make at home, you’re in the right place. Here’s a quick overview to get started:
- Mix carrier oils like jojoba or argan with liquid castile soap.
- Add aloe vera gel and your favorite essential oils.
- Combine in a foaming soap dispenser with distilled water.
- Shake well and enjoy fresh, clean skin!
When it comes to skincare, many of us are looking for effective yet simple DIY solutions that work for busy lifestyles. A foaming oil cleanser recipe not only provides a refreshing cleanse but is also hydrating, making it a versatile choice for various skin types. This DIY approach allows for complete control over ingredients, ensuring your skin only absorbs what you choose. Plus, making your own cleanser can be more sustainable and cost-effective than store-bought alternatives.
My name is Amanda Schmitt. As a mother of two and a former occupational therapist, I’ve dedicated my time to exploring and sharing family-friendly lifestyle solutions, including the best foaming oil cleanser recipe options. My journey in DIY skincare emphasizes practicality and effectiveness, ensuring you get the most out of your skincare routine.
Ingredients Needed for a Foaming Oil Cleanser
Creating your own foaming oil cleanser at home is a fun and rewarding way to take control of your skincare routine. Here’s what you’ll need to get started:
Carrier Oils
Carrier oils form the base of your cleanser and help dissolve makeup and impurities. They are gentle and nourishing, making them perfect for all skin types. Some popular choices include:
- Jojoba Oil: Known for its moisturizing properties, it closely mimics the skin’s natural oils.
- Argan Oil: Rich in vitamin E and essential fatty acids, it provides deep hydration.
- Olive Oil: A heavier oil that’s great for dry skin, offering intense nourishment.
- Coconut Oil: Lightweight and easily absorbed, ideal for a refreshing cleanse.
Castile Soap
Castile soap is a natural, vegetable-based soap that creates the foaming action in your cleanser. It’s gentle and effective at removing dirt and oils without stripping your skin. Look for a liquid version, like Dr. Bronner’s, for easy mixing.
Aloe Vera Gel
Aloe vera gel is a soothing ingredient that adds moisture and helps calm irritated skin. It pairs well with carrier oils to improve the hydrating effects of your cleanser.
Essential Oils
Essential oils not only add a pleasant scent but also offer various skin benefits. Choose oils based on your skin concerns:
- Lavender: Calming and soothing, perfect for sensitive skin.
- Frankincense: Known for its anti-aging properties.
- Tea Tree: Great for acne-prone skin due to its antibacterial effects.
- Rose: Hydrating and balancing, suitable for dry or mature skin.
Distilled Water
Distilled water is used to dilute the mixture and create the right consistency for a foaming cleanser. It’s free from impurities, making it a safe choice for skincare recipes.
With these ingredients, you can customize your foaming oil cleanser recipe to suit your skin’s unique needs. Whether you’re aiming for extra hydration, acne control, or anti-aging benefits, these components will help you achieve a clean, refreshed complexion.
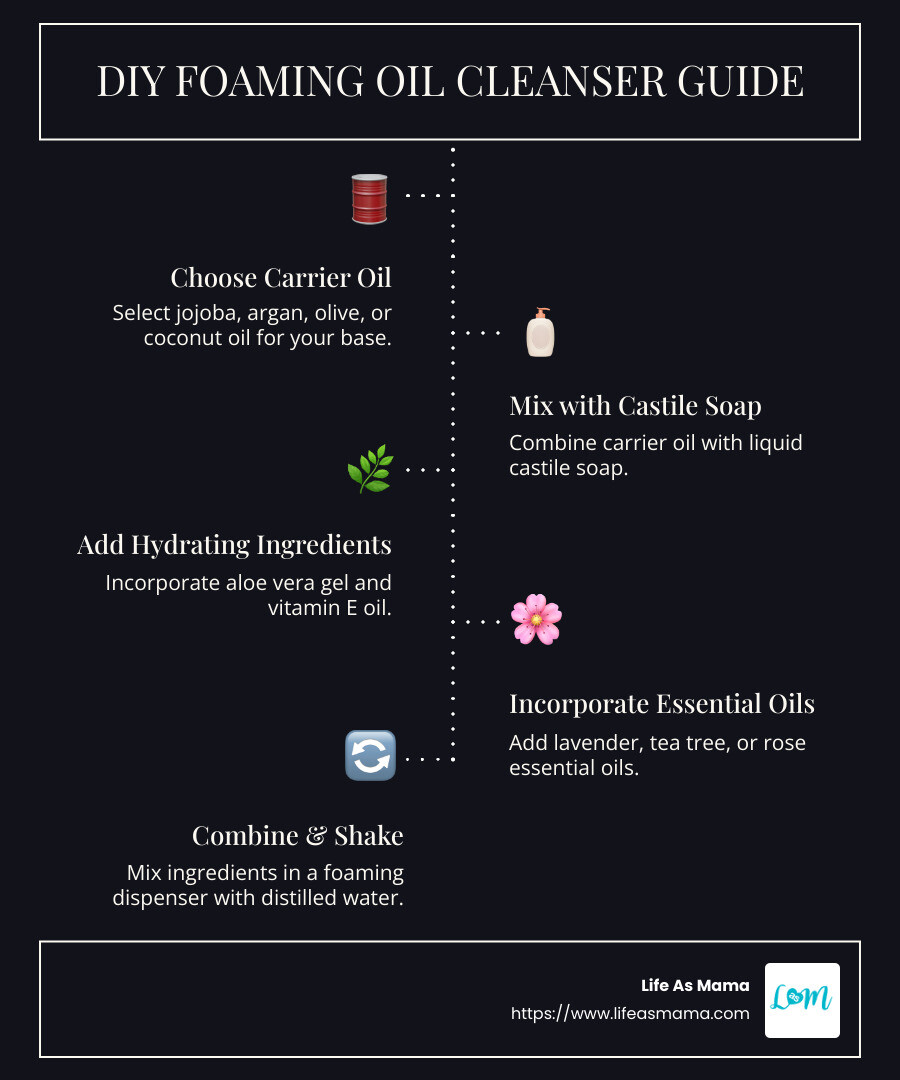
Step-by-Step Guide to Making a Foaming Oil Cleanser
Step 1: Choose Your Carrier Oil
Carrier oils are the backbone of your foaming oil cleanser. They help to dissolve makeup and dirt while nourishing your skin. Here are some popular options:
- Jojoba Oil: This oil is excellent for all skin types because it mimics the skin’s natural sebum, providing hydration without clogging pores.
- Argan Oil: Packed with vitamin E, it’s perfect for dry or aging skin, offering deep nourishment.
- Olive Oil: A heavier option, olive oil is great for those with dry skin needing extra moisture.
- Coconut Oil: Lightweight and fast-absorbing, it’s ideal for a refreshing cleanse.
Step 2: Mix with Castile Soap
Castile soap is a key ingredient that creates the foaming action in your cleanser. It’s gentle yet effective, making it a staple for DIY skincare. Opt for a liquid version like Dr. Bronner’s, which is easy to mix and available in various scents.
Step 3: Add Hydrating Ingredients
To boost the moisturizing properties of your cleanser, add hydrating ingredients:
- Aloe Vera Gel: Known for its soothing properties, it helps calm irritated skin and adds a layer of moisture.
- Rosehip Oil: Rich in essential fatty acids, it aids in skin regeneration and improves texture.
- Vitamin E Oil: Acts as an antioxidant, protecting the skin from free radicals and enhancing hydration.
Step 4: Incorporate Essential Oils
Essential oils provide both fragrance and skin benefits. Choose based on your skin type and concerns:
- Lavender: Ideal for calming and soothing sensitive skin.
- Frankincense: Offers anti-aging benefits and helps improve skin elasticity.
- Tea Tree: Known for its antibacterial properties, it’s perfect for acne-prone skin.
- Rose: Hydrates and balances, making it suitable for dry or mature skin.
Step 5: Combine and Shake
Now that you have all your ingredients, it’s time to mix them:
- In a foaming soap dispenser, add your chosen carrier oil, castile soap, and essential oils.
- Swirl the bottle gently to combine the ingredients.
- Add distilled water to dilute the mixture, leaving some space at the top for the pump.
- Cap the dispenser tightly and gently tip it back and forth to mix everything. Avoid shaking too vigorously to prevent excessive suds.
With these simple steps, you can create a personalized foaming oil cleanser recipe that suits your skin’s needs. Adjust the ingredients to focus on hydration, acne control, or anti-aging properties, and enjoy a refreshed, clean complexion every time you use it.
Customizing Your Foaming Oil Cleanser Recipe
Creating a foaming oil cleanser recipe custom to your skin type can make a world of difference in your skincare routine. Let’s explore how you can customize your cleanser for different skin needs.
For Dry Skin
Dry skin craves moisture. To give it the hydration it needs, consider using hydrating oils like sweet almond oil, which is lightweight yet nourishing. Adding aloe vera will help soothe and hydrate, while rose hydrosol can provide a gentle, aromatic touch that helps balance and moisturize dry skin.
For Oily or Acne-Prone Skin
If your skin is oily or prone to acne, you’ll want ingredients that help control oil without stripping your skin of moisture. Tea tree oil is a fantastic choice due to its antibacterial properties, which can help reduce acne. Incorporating witch hazel hydrosol or clary sage hydrosol can also aid in controlling excess oil and soothing inflammation.
For Aging or Blemished Skin
Aging or blemished skin benefits from ingredients that promote elasticity and skin renewal. Frankincense is renowned for its anti-aging properties, helping to reduce the appearance of fine lines. Pair it with chamomile hydrosol to calm and soothe the skin, and avocado oil for its rich, nourishing properties that support skin regeneration.
For Normal Skin
For those with normal skin, a balanced approach is key. Sweet almond oil is an excellent base, providing just the right amount of moisture. Combine it with cucumber hydrosol or geranium hydrosol for a refreshing and balancing effect that maintains your skin’s natural glow.
By tweaking your foaming oil cleanser recipe with these specific ingredients, you can address your unique skin concerns and enjoy a personalized skincare experience.
Benefits of Using a Foaming Oil Cleanser
Using a foaming oil cleanser can transform your skincare routine, offering multiple benefits that cater to various skin types and concerns.
Hydration
One of the standout benefits is hydration. Unlike traditional cleansers that can strip your skin of its natural oils, a foaming oil cleanser nourishes and moisturizes. The oils used in these cleansers, such as jojoba or argan, are rich in essential fatty acids that help maintain the skin’s moisture barrier. This ensures your skin remains soft and supple after cleansing.
Gentle Cleansing
Foaming oil cleansers provide a gentle yet effective cleansing experience. They work by breaking down and removing dirt, makeup, and impurities without harsh scrubbing. This makes them ideal for sensitive skin types that can react negatively to more abrasive cleansing methods. The mild nature of these cleansers helps prevent irritation and redness, leaving your skin feeling clean and comfortable.
Natural Ingredients
A major advantage of DIY foaming oil cleansers is the use of natural ingredients. By crafting your own cleanser, you can avoid harmful chemicals and additives often found in commercial products. Ingredients like aloe vera gel and essential oils offer soothing and healing properties, enhancing the natural glow of your skin. This approach not only benefits your skin but also aligns with a more eco-friendly and health-conscious lifestyle.
Customizable
Customizability is a key feature of foaming oil cleansers. You can tailor your cleanser to meet your specific skin needs by adjusting the types and ratios of oils and other ingredients. For instance, adding tea tree oil can target acne-prone skin, while rose hydrosol can boost hydration for dry skin. This flexibility allows you to create a product that addresses your unique skin concerns, ensuring optimal results.
By incorporating a foaming oil cleanser into your skincare routine, you can enjoy these benefits and more, paving the way for healthier, more radiant skin.
Frequently Asked Questions about Foaming Oil Cleanser Recipe
How to Make an Oil to Foam Cleanser?
Creating an oil to foam cleanser is simpler than you might think. You’ll need a few key ingredients: a carrier oil, castile soap, aloe vera gel, and essential oils. Here’s a quick guide:
-
Choose a Carrier Oil: Start with a skin-friendly oil like jojoba or argan. These oils are non-comedogenic, meaning they won’t clog your pores.
-
Mix with Castile Soap: Combine your chosen oil with liquid castile soap. This soap is gentle and effective, perfect for all skin types.
-
Add Hydrating Ingredients: Incorporate aloe vera gel to soothe and hydrate the skin.
-
Incorporate Essential Oils: Add a few drops of essential oils such as lavender or tea tree. These improve the cleanser’s properties and add a pleasant scent.
-
Combine and Shake: Pour the mixture into a foaming soap dispenser, add distilled water, and shake gently to mix.
This simple process will yield a foaming cleanser that gently cleanses while nourishing your skin.
What Should I Use First: Foam or Oil Cleanser?
This depends on your skin type and routine:
-
Normal Skin: You can start with either an oil cleanser to remove makeup and impurities, followed by a foaming cleanser for a deeper clean.
-
Combination Skin: Begin with the oil cleanser to tackle oily areas and follow with the foaming cleanser to maintain balance across your face.
In both cases, using an oil cleanser first can help break down makeup and excess oil, allowing the foaming cleanser to finish the job effectively.
How to Store and Use Your Foaming Oil Cleanser?
Storage Tips:
- Keep your foaming oil cleanser in a cool, dry place. A bathroom cabinet is ideal.
- Use a dispenser with a pump to minimize contamination and keep the product fresh.
Usage Tips:
- Use a small amount, about a dime-sized portion. Massage it gently into your skin in circular motions.
- Rinse thoroughly with lukewarm water and pat your face dry with a clean towel.
Shelf Life:
- Since this cleanser is made with natural ingredients, it doesn’t contain preservatives. Aim to use it within 3-6 months for optimal freshness and effectiveness.
By following these guidelines, your foaming oil cleanser will stay effective and safe for your skin.
Final Thoughts on the Benefits of a Foaming Oil Cleanser Recipe
At Life As Mama, we believe in the power of DIY skincare. Crafting your own products not only puts you in control of what goes on your skin, but it also adds a personal touch to your daily routine. Our Foaming Oil Cleanser Recipe is a testament to this philosophy. It’s simple, effective, and customizable to fit your unique skin needs.
Our platform is built on providing practical, family-friendly guides. We aim to make every project accessible and enjoyable for everyone. Whether you’re a busy parent or someone exploring new skincare alternatives, our guides are designed to fit seamlessly into your lifestyle.
DIY skincare is more than just a trend. It’s a way to connect with your family over fun, shared activities. Imagine the joy of creating a cleanser together, knowing it’s made from natural ingredients that are gentle on the skin.
As you dive into DIY, Life As Mama is here to support you with easy-to-follow recipes and tips. We hope our Foaming Oil Cleanser Recipe becomes a staple in your skincare routine, bringing hydration and gentle cleansing to your daily regimen.
For more family-friendly projects and tips, check out our Ultimate Easy-to-Clean Juicer for a Healthy Florida Lifestyle. Let’s continue creating memorable moments together!
Related Images:
Amanda Schmitt
Latest posts by Amanda Schmitt (see all)
- 20 DIY Easter Centerpieces That Aren’t Just for Kids - October 9, 2025
- 18 Adult Birthday Party Themes for a Sophisticated Celebration - October 3, 2025
- 20 Classic Orange & Black Halloween Ideas with Modern Twists - October 3, 2025